Halloween is one of my favorite holidays.
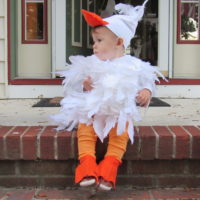
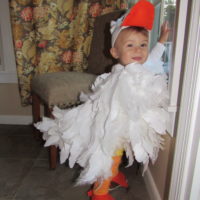
I’ve always loved getting dressed up even when I was little and my mom made Halloween costumes for us based on a specific theme. Peep these cute duck Halloween costumes!

When I was in high school, I took fashion design classes and learned how to sew. Those classes were the best thing I could have ever done. They taught me a skill that I have used throughout my entire life. When I was in college, I made costumes every year for my roommates and myself; 4 army girl costumes was my best one and I couldn’t quite top that, but having my sewing machine and expertise was handy for all the theme parties we went to!
Now onto the present day, I’ve always been pretty crafty around the house (making pillows and curtains, reupholstering chairs, repainting furniture), but I was so excited for my son, Jackson’s first “real” Halloween and to make him his duck Halloween costume (real because he was only 1-month old last year.)
I knew exactly what I wanted him to be… a duck. I was a duck for my first Halloween and I think it’s a cute baby costume. Also, how adorable would a side-by-side pic of both of us be for FB?! (Actually, I completely forgot to do that due to Halloween exhaustion #momfail.)

Here’s my step-by-step guide to making a no-sew, DIY duck Halloween costume:
Supplies:
- White t-shirt (at least two sizes larger than what your child typically wears)
- White feathers
- Orange leggings OR orange shorts & orange leg warmers
- Long-sleeved white onesie (or, if you’re making this for a child who is out of onesies- a long-sleeved white t-shirt)
- Orange felt (3 sheets)
- White felt (12-15 sheets)
- White beanie/hat
- Black Sharpie marker
- Hot Glue Gun with glue sticks (load up on these)
- Poly stuffing
- Piece of cardboard (to go inside t-shirt while glueing)
- Googly eyes (optional)

Steps to make this DIY, No-Sew Duck Halloween Costume:
- Prep your workspace: plug in the hot glue gun, lay down a tablecloth, and get a piece of cardboard to put inside the t-shirt. You’ll be gluing on both sides of the shirt, and without the cardboard, you will glue the shirt together.
- Make your feathers: I am sharing my technique but honestly, just make pieces of white felt that look like feathers. However you do it is fine. I cut the felt in half, then cut each side into 1/2 inch thick strips. I then cut the corners at one end to form a rounded point. Finally, make little cuts along both sides of the felt strip to give the feathers texture.
- Prep your real white feathers by clipping the stem off. Is the stick at the end of the feather called a stem? I don’t know. Just don’t make a costume that stabs your child through the t-shirt.
- Start with the front of the shirt.
- Start from the bottom of the t-shirt and work your way up to the neckline by placing a line of hot glue and adding felt feathers.
- About an inch above the felt feathers, add another line of hot glue and lay down the real feathers.
- End with felt feathers around the neckline.
- Make the tail: Take a full piece of white felt and fold it to make a triangle with a 2-inch flap remaining. Glue one side, let dry, stuff the triangle with paper towels (or poly stuffing), and glue the remaining side shut. Using the 2-inch flap, glue the felt piece to the back of the t-shirt to make the tail. By gluing the flap to the shirt, the triangle tail should wiggle from side to side.
- Complete alternating rows of felt and real feathers with hot glue on the back of the shirt and be sure to also cover the tail. You can get creative with the directions of the feathers on the tail.
- Using the orange felt, cut two rounded triangles to make the duckbill. It should be about 4 inches in length and 2-3 inches wide. You can glue and stuff the bill, then glue to the white cap. (see pictures.) You can add googly eyes to the cap, if you want.
- Use a black sharpie to make nostrils (do ducks have nostrils? This is the point in the DIY that you may start to feel a little crazy.)
- Use your child’s shoes for reference and cut orange felt feet to tie around the ankles. Hot glue edges over and middle to give the appearance of feet and use Black Sharpie to make toenails (do ducks have toenails?)
- When the shirt is finished and dry, cut up the side seam of the t-shirt (on both sides) and through the seam that runs under the arm/armpit. Basically, when you’re getting your little one dressed, you’ll pull the t-shirt over their head and it will be a poncho. You can add ties on the side with an extra white felt if you want to keep it closed. I found that from gluing the feathers, the shirt became really tight and hard to get on Jackson and it was two sizes larger than his normal size, so cutting the sides and making it a poncho made it SO much easier.


Do you DIY your kids’ Halloween costumes? Let us know what tips and tricks you have in the comments! If you try this DIY, no-sew duck Halloween costume, share pictures and tag us @VTMom!
Check out these other easy Halloween costume ideas from the moms here at Vermont Moms:
- Easy Halloween Costumes – No Purchase Necessary
- Do It Yourself Ruth Bader Ginsburg Halloween Costume
- The Art of the Family Costume — Halloween Fun
Pin this post and be sure to follow Vermont Moms on Pinterest!
Vermont Mom Insiders get exclusive content that you do not want to miss, so sign up today!


