This is Caroline’s first Christmas, which is also the first Christmas for my side and Jason’s side of the family to have a grandchild/niece/nephew to shower with gifts.
When deciding what to get our family members, among other gifts we decided to make something personal for each of Caroline’s grandparents, aunts and uncles.
Growing up I remember making ornaments that were made of cinnamon that held their yummy scent with each year that passed. I decided to attempt to make these with Caroline as well.
And although it was super simple, anything involving a 9 month old is an adventure… I wanted to include her hand print on each ornament… I settled for what I could get!
Recipe:
1 cup of cinnamon (this is a lot of cinnamon, get the cheapest stuff you can find, you aren’t eating it!)
¾ cup of apple sauce
1 Tbs. of cloves
1 Tbs. of nutmeg (I didn’t have nutmeg so I opted to use allspice instead)
2 Tbs. of glue (like Elmers)
Hint: For the 16+ ornaments I made I doubled this recipe, however my ornaments were on the larger side and I had some dough left over.

Making the ornaments:
1. Mix all of the ingredients together. Have extra cinnamon and applesauce on hand in case the mixture is too wet or too dry.
Hint: Use your hands, it mixes together very easy. Also, the picture below is not a double batch of the recipe. Although, I doubled it, I made each batch individually.

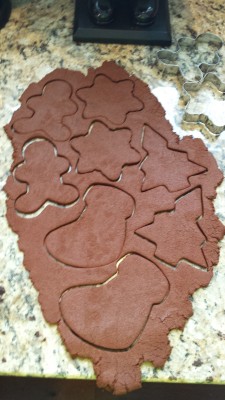
2. Sprinkle countertop with cinnamon and roll the dough out. Depending on what you want to do with the dough it should be about a 1/4 inch thick.
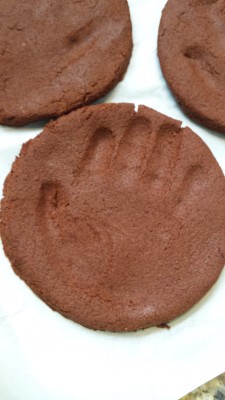
Hint: When making ornaments with Caroline’s hand print I made them a little thicker to make sure the dough could hold up to her hand.

3. Using either cookie cutters or a bowl, cut out ornaments. Take scraps and reroll using up all of the dough.

4. Put ornaments onto parchment paper on top of cookie sheet and push child’s hand into the dough.
Hint: Caroline only let me do this 4 times before she stopped cooperating. So I went to Plan B. I used cookie cutters to cut out Christmas shapes and instead pushed Caroline’s finger or toes into each ornament.
5. Using a straw or toothpick put a hole at the top of each ornament

6. Put cookie sheet with ornaments into a preheated 200 degree oven and leave for several hours.
Hint: After 4 hours my thinner ornaments were completely done. My thicker ones were not, but after being left overnight they finished drying out. If you would rather not use an oven you can leave ornaments out for 4-5 days to dry.
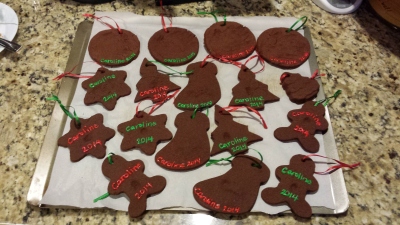
7. Cut and tie a piece of ribbon onto each ornament.

8. If desired, use paint to decorate the ornaments.
Hint: Puff paint (meant for decorating clothing) is a very easy medium to use to write out words
9. Let dry and you are all done! All you need to do now is either put them in a gift bag or on the tree!

Although these ornaments take time to bake/dry and there seems to be several steps they are actually very easy to make. Creating the dough is also very forgiving, and if you don’t want to use cloves or nutmeg (as they are expensive) you can skip them and add more cinnamon.
Even though they did not all come out the way I had wanted, I know that at the very least each smells delicious and that Caroline touched each one so our family will go crazy over them.


